FAQs
We are here to solve your problems
-
Self Help Videos
GMap: Adding Collaborators & Sharing Cases
-
Self Help Videos
Orthofix: Cage Tool
Surgimap Desktop Software: Learn how to apply the Orthofix Cage Tool to images.
-
Self Help Videos
K2M: Cage Tool
Surgimap Desktop Software: Learn how to apply the K2M Cage Tool to images.
-
Self Help Videos
Surgimap Desktop Software: Lumbar Lordosis
Apply a Lumbar Lordosis measurement to an image.
-
Self Help Videos
Surgimap Desktop Software: Cervical Wizard
Apply the Cervical Wizard Tool measurement to an image.
-
Self Help Videos
Surgimap Desktop Software: Overview
See an overview of the Surgimap desktop software Version 2.2.0+
-
Technical Issues
I imported a non-DICOM image. How do I calibrate it?
DICOM images are automatically calibrated, however non-DICOM images (e.g. JPEGs, PNGs, BMPs) must be manually calibrated for length measurements. Use the calibrate tool to draw a line over a known landmark, then enter its length in mm.
-
Self Help Videos
Surgimap for Orthofix: Getting Started
-
Self Help Videos
Surgimap for Orthofix: Create a Case
-
Self Help Videos
Surgimap for Orthofix: Adding Contacts
-
Self Help Videos
Surgimap for Orthofix: Adding Collaborators & Sharing Cases
-
Self Help Videos
K2M: Pre-Bent Rod Tool
-
Self Help Videos
GMap: Adding Contacts
-
Self Help Videos
GMap: Create a Case
-
Self Help Videos
Surgimap Desktop Software: Coronal Wizard
Measure Cobb angles, view upper/lower limits for each curve, and more in just 6 clicks with the coronal wizard.
-
Technical Issues
How do I measure using the Surgimap iOS app?
To apply measures on the Surgimap mobile app for iPhone/iPad (only for international users): Make sure you are set to International mode: Tap the settings icon, then App Version, and set to International Open an image: Go to the Patients or Cases screen, locate an image thumbnail to measure, and tap on it to open […]
How do I measure using the Surgimap iOS app?
To apply measures on the Surgimap mobile app for iPhone/iPad (only for international users):
- Make sure you are set to International mode: Tap the settings icon, then App Version, and set to International
- Open an image: Go to the Patients or Cases screen, locate an image thumbnail to measure, and tap on it to open in full size.
- Now at the bottom of the image you will find a toolbar with a selection of Measuring and Surgical tools. Scroll to the right to customize your visible tools.
- Tap on the Measuring tool you wish to apply, then follow the help pop-up by dragging or tapping your finger accordingly. Once complete, you may fine tune your measurement by dragging any of the adjustable handles. Tap anywhere on the image outside of the measurement to deselect the tool. Tap the measurement to view and modify the handles.
- While applying a measurement or surgical simulation you may wish to zoom in/out, change brightness/contrast, flip, pan, etc. Tap the menu icon with the 3 horizontal bars in the top right to access the various image adjustment tools.
-
Self Help Videos
GMAP: Globus Medical Cage Tool
-
Self Help Videos
Surgimap Desktop Software: Download and Register
-
Self Help Videos
Surgimap Desktop Software: Pedicle Screw Planning
-
Self Help Videos
Surgimap for Android
-
Technical Issues
I have been receiving too many notifications. How do I prevent this?
To customize your Surgimap notifications, go to the Settings panel by clicking the gear icon at top right. Scroll down on the Application page to the Notifications section to select the desired notification alert types and expiration period.
-
Self Help Videos
Surgimap Desktop Software: Customizable Viewing
-
Technical Issues
Why can’t I log into Surgimap after updating to the latest version? I am using Windows 10.
On Windows 10, the Surgimap desktop software may be incorrectly flagged as an unauthorized application by the Windows Defender Security Center. When attempting to log into Surgimap, you may receive an error message notifying that you do not have permission to write to your SurgimapDatabase folder. To bypass this restriction and continue to use Surgimap, […]
Why can’t I log into Surgimap after updating to the latest version? I am using Windows 10.
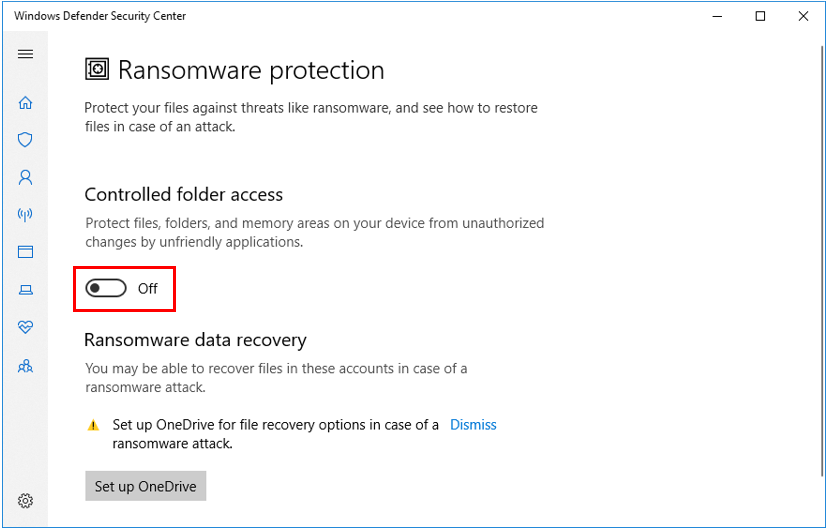
On Windows 10, the Surgimap desktop software may be incorrectly flagged as an unauthorized application by the Windows Defender Security Center. When attempting to log into Surgimap, you may receive an error message notifying that you do not have permission to write to your SurgimapDatabase folder.
To bypass this restriction and continue to use Surgimap, please perform a search for “Controlled folder access” and turn off this setting. Relaunch the Surgimap application to verify whether login is successful. If not, proceed to the next section.
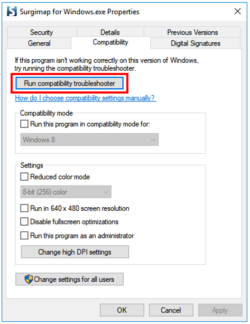
Ensure that Surgimap is compatible with your Windows version. Locate where Surgimap has been saved and check compatibility for both the Surgimap for Windows.exe and the Surgimap.exe within the application-x64 folder. Right click on each file, select Properties, and click on the Compatibility tab to run the compatibility troubleshooter with the recommended settings. Test the program to verify whether login is successful. If not, proceed to the next section.
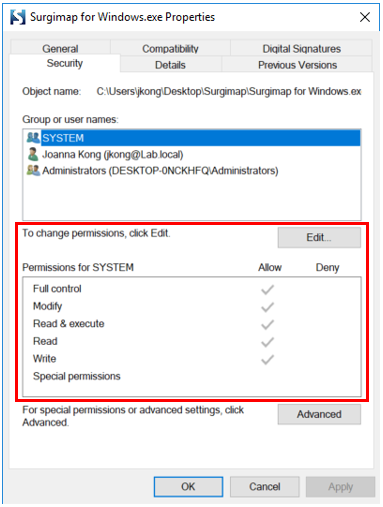
Verify that you have allowed Surgimap full permissions to run properly. Click on the Security tab within the Properties window. If you have not allowed full permissions please click on the Advanced tab and allow them. Relaunch the Surgimap application to verify whether login is successful. If not, proceed to the next section.
Download a new version of the Surgimap software and migrate your old database into the new version.
To download a new version of the software:
1. Visit our Windows download page: https://www.surgimap.com/download-surgimap-spine-2#Windows
2. Select option “Manual Install Zip File” to download the SM2WindowsBundle
3. Create a new folder for Surgimap on your desktop
4. Copy and paste all contents of the SM2WindowsBundle folder (from Step 2) into the new Surgimap folder on your desktop (from Step 3)
5. Launch the “Surgimap for Windows” application from the new folder on your desktopTo migrate your old Surgimap database into the new version:
1. Sign into the new Surgimap, then click on Import tab (top left area)
2. Use the center column option to select Other Surgimap 2 database (second option from bottom)
3. Click the “Search” button in top right area to open a pop-up window
4. Find your old Surgimap path by looking for a line that ends with your email address and click on it, then enter your password in bottom right area
5. Once you see all your patients you can multi-select (click first patient, hold Shift key, click last patient) and then right click the highlighted area and select ImportIf you are able to successfully log in and recover your old patient database in the new version of Surgimap, you may then uninstall/delete the old Surgimap application. If you are still unable to log in, please contact support@surgimap.com.
-
Technical Issues
I entered DICOM node details into Surgimap Settings and PACS. Why does the import fail?
If send from PACS and/or query/retrieve does not work after inputting the DICOM node information in both Surgimap and PACS: 1. Ensure there is only once instance of Surgimap running (no instances of Surgimap running in the background). To verify this go to Task Manager > Processes > scroll down to Surgimap. If there are […]
I entered DICOM node details into Surgimap Settings and PACS. Why does the import fail?
If send from PACS and/or query/retrieve does not work after inputting the DICOM node information in both Surgimap and PACS:
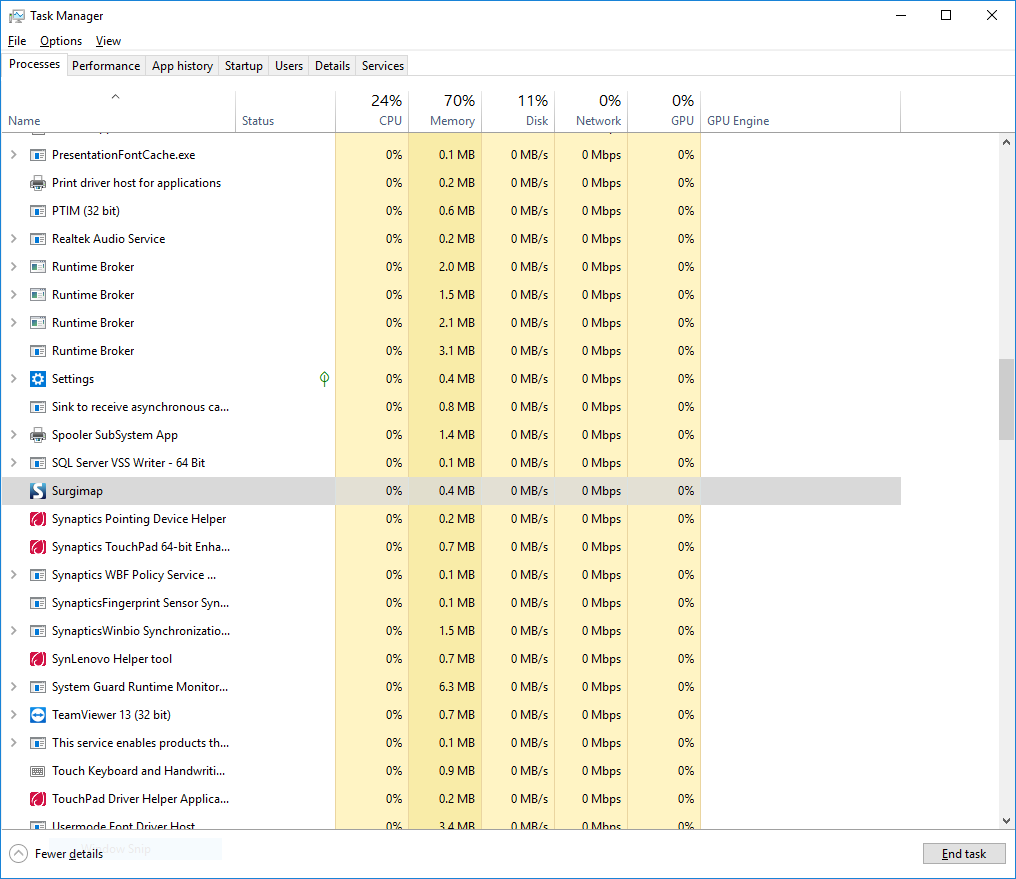
1. Ensure there is only once instance of Surgimap running (no instances of Surgimap running in the background). To verify this go to Task Manager > Processes > scroll down to Surgimap. If there are multiple Surgimap processes, close all of them and relaunch the Surgimap application. It is recommended that you regularly shut down or restart your computer to avoid multiple processes being generated.
2. Use the 12346 port for the local DICOM node in both PACS and Surgimap. If that does not work, try port 104.
3. Change the Surgimap settings in the Local Configuration (SCP) section according to your PACS provider by using the below drop-down menu and hitting Apply. This is a one-time application and does not need to be updated with each new login. Expand the Advanced section to view the default settings for each PACS provider and to customize additional DICOM settings. -
Technical Issues
Can I stitch sectional images together with Surgimap?
Yes, it is possible to stitch multiple sectional images together using Surgimap. For example, you may combine an AP thoracic and an AP lumbar for a full spine AP view. The image stitch capability is available in the Surgimap desktop software versions 2.2.15 and higher. Once you log into the software, please go to your […]
Can I stitch sectional images together with Surgimap?
Yes, it is possible to stitch multiple sectional images together using Surgimap. For example, you may combine an AP thoracic and an AP lumbar for a full spine AP view. The image stitch capability is available in the Surgimap desktop software versions 2.2.15 and higher.
Once you log into the software, please go to your Patients screen > Thumbnails > hold down the Shift or Ctrl key to multi-select the images > right click and select “Stitch Images”. You may then re-position each sectional image using the directional arrows and adjust their opacity, rotation, and/or scale. Once complete, press save to store the stitched image in your database.
-
Technical Issues
Can I assign shortcuts/hotkeys for frequently used commands?
Yes, go to Settings (gear icon top right) > Shortcuts tab to customize keyboard shortcuts for individual commands and/or tools.
-
Technical Issues
I have a lot of patients in my database. How can I organize them?
Patient labels are available in the Surgimap desktop software version 2.2.15 and higher. To create a label: 1. Go to Database > Patients 2. Click the (+) icon to the right of the search bar 3. Create a label title > set a label color 4. (Optional) Click “Add Collaborators” to share the label to […]
I have a lot of patients in my database. How can I organize them?
Patient labels are available in the Surgimap desktop software version 2.2.15 and higher.
To create a label:
1. Go to Database > Patients
2. Click the (+) icon to the right of the search bar
3. Create a label title > set a label color
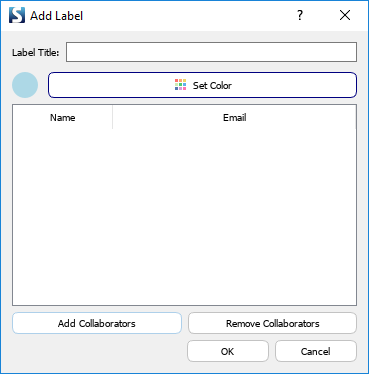
4. (Optional) Click “Add Collaborators” to share the label to a contact or groupTo assign/manage labels:
1. Select a patient (hold Shift or Control to multi-select patients) > right click > Assign Label
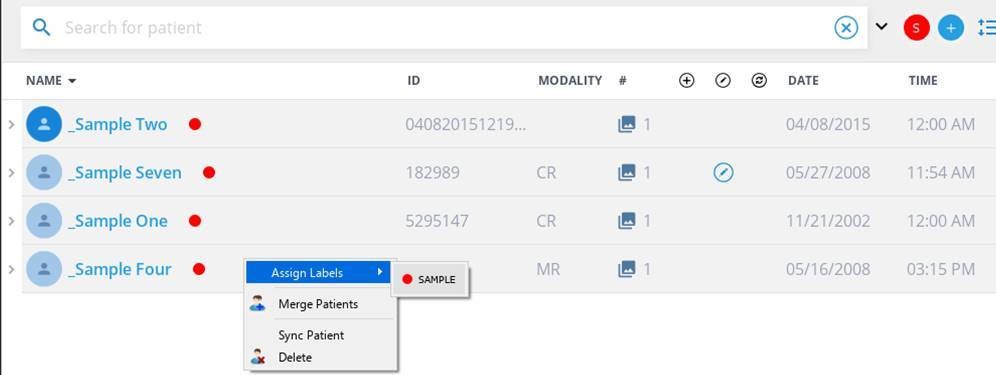
2. To filter patients by label, click the label in the column header -
Self Help Videos
Surgimap Desktop Software: Sagittal Wizard
Surgimap’s Sagittal Alignment Wizard calculates over twenty measurements in a few simple clicks.
-
Self Help Videos
Surgimap Desktop Software: Adding Images to an Existing Case
Learn the exact steps needed to import images into an existing case in your database tab.
-
Technical Issues
Who can I contact for help?
Our team is always available to answer questions about Surgimap.
Who can I contact for help?
For help with applying measurements, a built-in help function is displayed at the top left of the Measure Screen. This section displays step-by-step instructions on how to apply the tool. You can also send an email to support@surgimap.com for guidance or to request an online demo.
-
Technical Issues
I received a USB with the software, can I copy the software to my laptop?
Our users can copy the Surgimap software to any personal laptop.
I received a USB with the software, can I copy the software to my laptop?
Yes, please create a “Surgimap” folder on your computer and copy/paste or drag/drop all contents of the USB into it. It is important to ensure all file contents are copied over. You can also copy the software to a larger USB key to allow for a larger database.
-
Technical Issues
Why can’t I launch Surgimap?
Are you already running Surgimap?
Why can’t I launch Surgimap?
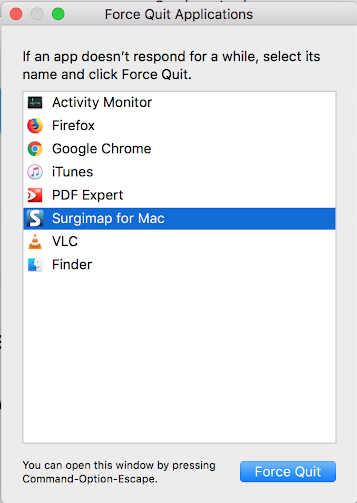
Sometimes Surgimap application processes do not fully terminate when you close the software. If you are already running Surgimap somewhere on your computer, you will be prevented from launching the software again. Follow the steps below to determine if you are running the Surgimap software in the background.
Mac:
- Click the apple button in the top left corner of your screen then select “Force Quit…”
- Highlight the “Surgimap” application and click “Force Quit”
- You should now be able to relaunch the Surgimap software
Windows:
- Press and hold the CTRL+ALT+DELETE keys, then select Task Manager.
- Scroll down on the Processes tab to highlight each “Surgimap” process, then click End Task.
- You should now be able to relaunch the Surgimap software
-
Technical Issues
Is the Surgimap software compatible with my operating system?
Upgrade your software if your Mac operating system is 10.8.XX
Is the Surgimap software compatible with my operating system?
Below are Surgimap’s minimum software requirements for Windows and Mac. If your computer is running an older operating system, please upgrade your OS before attempting to launch Surgimap again.
Windows: Microsoft Windows 7 or newer
Mac: Apple Mac OS X 10.10 or newerPlease contact support@surgimap.com for additional guidance.
-
Technical Issues
Why can’t I register? I am running Surgimap behind my hospital firewall.
Get in touch with your IT department.
Why can’t I register? I am running Surgimap behind my hospital firewall.
Please alert your hospital IT staff and send them our Network Connection Guidelines so that they can allow access to the hospital network. You can also send an email to support@surgimap.com and we can help create an account for you.
-
Technical Issues
Why am I receiving a “Failed to Authenticate Offline” error message?
Hospital firewalls may prevent login
Why am I receiving a “Failed to Authenticate Offline” error message?
If you receive a “Failed to Authenticate Offline” error message when attempting to login on your hospital or clinic computer, your network firewall is preventing Surgimap from running.
If you receive this message:
1. Make sure your account is activated. You received a “Surgimap Activation” email when you created your account, activation must be completed to access Surgimap.
2. Enter the correct email address and password associated with your Surgimap account. If you need to reset your password, please click “Forgot password” on the login screen to receive an email with secure password reset link.If you are still receiving “Failed to Authenticate Offline” error, please refer to our Hospital and Network Connection Guidelines. This document lists the various ports and URLs that your IT department must allow on the network in order for Surgimap to run.
-
Technical Issues
How do I connect Surgimap to a hospital PACS system?
Follow these guidelines to ensure a good Surgimap/PACs connection.
How do I connect Surgimap to a hospital PACS system?
Please refer to the Setting Up the PACS/Surgimap Connection section on our IT Department page. You will need to engage your PACS administrator/IT department to add a new DICOM node destination on the hospital network. Those details will also need to be entered into Surgimap Settings on the DICOM Nodes tab.
If you have any questions or need guidance during the process, email support@surgimap.com or call 646-794-8650.
-
Technical Issues
How do I connect Surgimap to import images from OsiriX or Horos?
Use our step-by-step user guide. If you are still having trouble, you can contact the Surgimap team for assistance.
How do I connect Surgimap to import images from OsiriX or Horos?
Follow the steps in our Connecting to OsiriX User Guide or Connecting to Horos User Guide.
If you have any questions or need guidance during the process, email support@surgimap.com or call 646-794-8650.
-
Technical Issues
Why do I receive error message “Too many results returned” during import from PACS?
Increasing the ‘Maximum Number of Patients’ in settings may solve your problem.
Why do I receive error message “Too many results returned” during import from PACS?
This message applies to users who have successfully established a PACS/Surgimap connection. This error message may appear on the import screen when a user is attempting to import images from PACS into Surgimap. If you receive this message, please follow the below instructions:
1. Search by specific ID: Use the drop-down selector to change the search criteria to something more specific, e.g. Patient ID or Accession #.
2. Increase your ‘Maximum Number of Patients ‘ & ‘Maximum number of Studies’ in your settings.
- Go to Settings and click the ‘DICOM Nodes’ tab
- In the ‘Local Configuration’ section, increase the ‘Maximum Number of Patients ‘ & ‘Maximum number of Studies’
If you are still experiencing issues, please contact our team at support@surgimap.com.
-
Technical Issues
When I search my PACS system in Surgimap, why can’t I locate my patient image?
Wildcard Policy
When I search my PACS system in Surgimap, why can’t I locate my patient image?
The “Wildcard Policy” determines the mode in which Surgimap searches for data from PACS:
- No Wildcard: Whatever information you put in your search bar in the import screen, must match exactly to the information in your PACs system. Ex: Search term “John Doe”. Search results “John Doe”, NOT “Doe, John” or “JDoe”.
- Trailing: The information searched will be tagged in the front of any of the search results. Ex: Search “John”, search results “John”, “John Doe”, “JohnD”, NOT “DJohn” or “Doe, John”.
- Leading & Trailing: The information search will be tagged in the front and back of any search results. Ex: Search “John”, search results “John Doe”, “JohnD”, “DJohn”, “Doe, John”, “DoeJohn”, etc…
You can change this setting by going to Settings, clicking on the ‘DICOM Nodes’ tab and scrolling down to “Advanced Settings”. Change your Wildcard policy to “Leading and trailing” for a more comprehensive search output.
-
Technical Issues
How can I import images that I have saved in a PowerPoint presentation?
Simply save the PPT as jpeg.
How can I import images that I have saved in a PowerPoint presentation?
Open the PPT document, use “Save As JPEG”, and export “All Slides”. This will create a new folder and save each slide of the presentation as a separate JPEG image. On the Surgimap Import screen, navigate to this folder, select the desired JPEG images, and save to your patient database.
-
Technical Issues
Can I customize my viewing layout?
Discover Surgimap’s “Tiles/Tabs” feature.
-
Technical Issues
What do the screw dimensions represent?
Learn about Surgimap’s screw dimensions.
-
Self Help Videos
Surgimap Desktop Software: SA Norm Tool (Ideal Alignment)
-
Premium Features
Are any vendor implant templates available as surgical tools?
Contact us for more information.
Are any vendor implant templates available as surgical tools?
Yes, Surgimap offers vendor specific implant tools that can be activated for your Surgimap account. See our Partners Page for a list of industry partners. Visit our Features Page or contact support@surgimap.com to request partner features.
-
Self Help Videos
Surgimap Desktop Software: Wedge Osteotomy
Surgimap Desktop Software: Discover how to apply and simulate a wedge osteotomy on Surgimap.
-
Premium Features
How do I sync images from the desktop software to the cloud and mobile app?
Sync the patient on your desktop software for viewing on your mobile device.
How do I sync images from the desktop software to the cloud and mobile app?
Cloud synchronization is a premium feature available to healthcare providers and our industry partners. To request this feature please visit our Features Page or email support@surgimap.com.
The software’s default synchronization setting is to manually select patients for cloud sync. Please select a patient in your Database or hold Shift or Ctrl to multi-select patients, then mark “Sync Patient” from the context menu. The cloud icon at top right corner will change color to indicate sync status; green indicates sync complete. Patients that have been successfully synced will be indicated with this icon in the Database:
 .
.To automatically sync all patients, please go to Settings (gear icon top right) > Access tab > change Synchronization type to “All patients, all images”.
-
Self Help Videos
Surgimap Desktop Software: Create a Case
Learn how to create cases from existing patients in your Surgimap database.
-
Self Help Videos
Surgimap Desktop Software: Adding Collaborators to Cases
Discover how to add your Surgimap contacts as case collaborators. Adding a contact as a case collaborator allows the individual to view case images and details. You must have Surgimap’s Access feature activated on your account to execute this feature. Please contact support@surgimap.com, for Access activation.
-
Premium Features
How do I export an image with measurements?
Exporting your Surgimap images is simple.
How do I export an image with measurements?
Image export is a premium feature available to healthcare providers upon request. Visit our Features Page or email support@surgimap.com to request this feature.
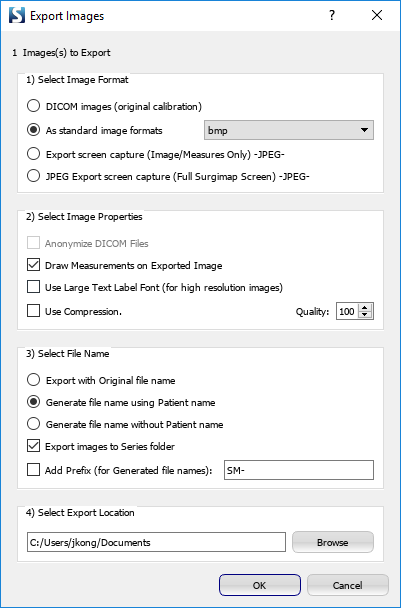
To export an image with measurements, open the image, click the menu icon at the top right corner, and select “Export”. Select the desired image format, image properties, and export location. Be sure to check the box “Draw measurements on exported image”.
-
Self Help Videos
Surgimap Desktop Software: Image Export
Surgimap Desktop Software: Learn how to export images from your Surgimap database to your personal computer.
-
Premium Features
How do I export my Surgimap data into an Excel spreadsheet?
It’s simple, just follow the steps in our YouTube video.
How do I export my Surgimap data into an Excel spreadsheet?
Image export is a premium feature available to healthcare providers upon request. Visit our Features Page or email support@surgimap.com to request this feature.
To export measurement data for your entire Surgimap database:
1. Go to the Database screen
2. Click the Export Database Spreadsheet icon on the right menu bar
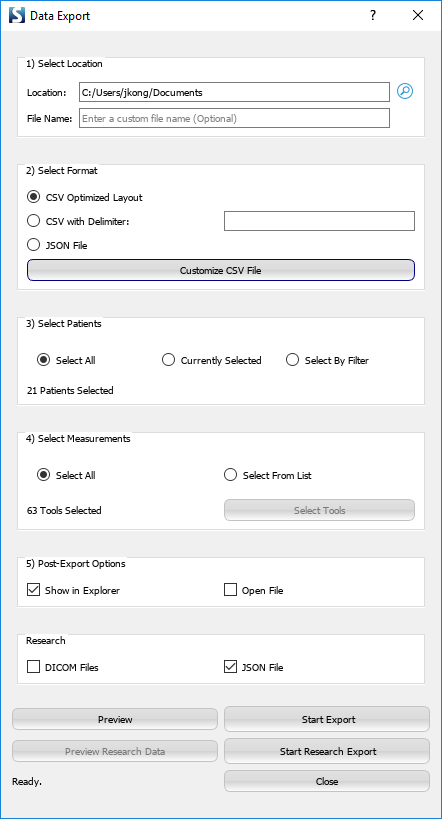
3. Select export location, file format, patients, measurements, etc.To export measurement data for one particular image:
1. Open the image on the Measure screen
2. Click the menu icon at the top right corner of the image
3. Select Data Export
4. Select export location, file format, measurements, etc.

